Phone Fixing
Android Phone Overheating and How to Fix Your Phone in 2024

How to Fix Your Android Phone Overheating
If your Android phone is overheating, there are several steps you can take to address the issue and prevent it from happening again. Let’s explore some solutions:
- Check for Buggy Apps:
- Sometimes, poorly optimized or buggy apps can cause your phone to overheat. If you suspect a specific app is the culprit, try the following:
- Uninstall the app: If you recently installed a new app that seems to be causing overheating, consider uninstalling it.
- Check for updates: If an app you use regularly has been updated recently, it might be causing the issue. Check for updates and see if that resolves the problem.
- Avoid Intensive Camera Use:
- Prolonged use of your phone’s camera can lead to overheating. Be cautious when recording videos for extended periods.
- If you’re using the camera in a hot environment (such as direct sunlight), keep the phone in the shade or use your vehicle’s air conditioning system to cool it down.
- Adjust Device Settings:
- Lower the screen brightness to reduce power usage.
- Consider turning on airplane mode to disable battery-draining features like Bluetooth.
- Restart your device to clear temporary files or processes that may contribute to overheating.
- Remove Your Phone From Extreme Environments:
- Keep your phone in an environment with temperatures between- 4°F and 113°F (or -20 °C to 45°C). Extreme temperatures can cause overheating.
Remember, a slightly warm phone after heavy usage is normal, but if your phone feels unusually hot to the touch or displays alerts about overheating, investigate further. These steps should keep your Android phone cool and functioning optimally. 📱❄️
Can using a case cause overheating?
Using a phone case can contribute to overheating, although it depends on the type of case and how it’s used. Here are some considerations:
- Material and Insulation:
- Thick or heavily insulated cases can trap heat around your phone, mainly if they cover the entire device tightly.
- Cases made of leather or rubber may retain heat more than thinner, breathable materials.
- Blocking Ventilation:
- Some cases cover essential ventilation points, such as the area around the processor or the phone’s back.
- If your phone’s cooling system relies on passive airflow (e.g., through small openings), obstruction of these openings can hinder heat dissipation.
- Intensive Usage:
- If you’re using your phone intensively (e.g., playing graphics-heavy games, recording videos, or running resource-intensive apps), the combination of case insulation and high workload can lead to overheating.
- In such cases, consider removing the case temporarily during heavy usage.
- Wireless Charging:
- Wireless charging generates heat and, in some cases, can exacerbate this.
- If you notice your phone getting hot during wireless charging, try charging without the case.
- Sun Exposure:
- Leaving your Mobie phone in direct sunlight can cause it to overheat, especially inside a case.
- Dark-colored cases absorb more heat, so be cautious in hot environments.
- Phone-Specific Factors:
- Some phones have built-in thermal management systems that adjust performance based on temperature. A thick case might interfere with this system.
- Check your phone’s documentation or manufacturer’s recommendations regarding cases.
Recommendations:
- Opt for thin, well-ventilated cases that allow airflow.
- Remove the case during intensive tasks or when charging wirelessly.
- Avoid leaving your mobile phone in direct sunlight for extended periods.
Remember that while cases can contribute to overheating, they protect your phone from physical damage. Balance protection with heat dissipation based on your usage patterns. 🔥📱
Can a damaged battery cause overheating?
Can a damaged battery cause overheating?
A damaged battery can indeed lead to overheating in your phone. Here’s how:
- Internal Short Circuits:
- A damaged battery may develop internal short circuits due to physical-damage or wear and tear.
- These short circuits can cause the battery to overheat during charging or usage.
- Swelling and Increased Pressure:
- A damaged battery might swell or expand due to chemical reactions or physical stress.
- Swelling increases the pressure inside the battery, leading to heat generation.
- Electrolyte Leakage:
- The electrolyte (the liquid inside) may leak if the battery casing is compromised.
- Electrolyte leakage can cause chemical reactions and heat and pose safety risks.
- Reduced Capacity and Efficiency:
- A damaged battery has reduced capacity and may need help to deliver power efficiently.
- As it works harder to meet demands, it generates more heat.
- Thermal Runaway:
- In extreme cases, a severely damaged battery can experience thermal runaway.
- This is an autonomous process where heat causes further damage, leading to more heat, and so on.
- Thermal runaway can result in fire or explosion.
Signs of a Damaged Battery:
- Sudden Shutdowns: If your phone turns off unexpectedly, it could be due to a damaged battery.
- Swelling: A visibly swollen battery is a clear sign of damage.
- Excessive Heat: The battery might be at fault if your phone feels unusually hot during everyday use.
Precautions:
- Replace Damaged Batteries: If you suspect battery damage, seek professional help to replace it promptly.
- Avoid Extreme Temperatures: High temperatures (e.g., leaving your phone in a hot car) can worsen battery damage.
Remember, a healthy battery is crucial for your phone’s performance and safety. If you suspect battery issues, consult a technician to assess and address the problem. 🔋🔥
Can I replace my phone’s battery myself?
Replacing your phone’s battery is possible, but it depends on the phone model and technical skills. Here are some steps to guide you through the process:
- Check Your Phone Model:
- First, identify your phone model. Different phones have varying designs, and some are more user-friendly for battery replacement than others.
- Search for your specific phone model and “battery replacement guide” to find detailed instructions online.
- Gather Tools and Supplies:
- You’ll need a few tools, including:
- Small screwdrivers: To open the phone casing.
- Plastic prying tools: To safely remove the back cover or separate components.
- Replacement battery: Purchase a compatible battery for your phone model.
- Adhesive strips: Some phones use adhesive to secure the battery.
- Back-Up Your Data:
- Before opening your phone, back up all your essential data; removing the battery involves disconnecting components, and accidents can happen.
- Power Off Your Phone:
- Turn off your phone completely to avoid any electrical mishaps during the replacement process.
- Remove the Back Cover:
- If your phone has a removable back cover, gently remove it using plastic prying tools.
- For phones with non-removable backs, follow the next steps.
- Open the Phone Casing:
- Use the appropriate screwdriver to remove any screws-securing the casing.
- Carefully pry open the casing using plastic tools. Be gentle to avoid damaging internal components.
- Disconnect the Battery:
- Locate the battery connector (usually near the bottom of the phone).
- Gently disconnect the battery-cable from the motherboard.
- Replace the Battery:
- Remove the old battery.
- Insert the new battery in the same position.
- Reconnect the battery cable.
- Secure the Casing and Back Cover:
- Close the phone casing and secure any screws.
- If your phone uses adhesive strips, apply them to hold the battery.
- Power On and Test:
- Turn on your phone and check if it functions properly.
- Monitor the temperature to ensure it doesn’t overheat.
Important Notes:
- Warranty: Opening your phone may void the warranty. Check if your phone is still under warranty before proceeding.
- Risk: DIY battery replacement carries risks. If you need more clarification, consider professional repair services.
- Safety: Be cautious of sharp edges and delicate components.
Remember, if you’re uncomfortable with the process or have any doubts, seek professional help. 🔧📱
How much does it cost to replace phone battery?
The cost of replacing a mobile phone battery can vary based on the phone model, location, and whether you choose official service centers or third-party repair shops. Here are some estimates:
- iPhone Battery Replacement:
- If you have an iPhone, Apple offers battery replacement services. The cost depends on your warranty coverage:
- Android Phones:
- Android phones vary widely so that costs can differ. Generally, battery replacement at official service centers may cost around $50 to $100 ↗.
- Third-party repair shops may offer similar pricing.
- Specific Examples:
- Square Repair (UK): Replacing recent iPhone models through Square Repair could range from £60 to £70 per device4.
- Local Repair Shops: Prices may vary, but expect a similar range.
Remember that prices can fluctuate based on location, phone model, and the specific repair service you choose. If you need clarification, check with authorized service providers or local repair shops for accurate estimates. 🔋💡
Can I recycle my old phone batteries?
Recycling old phone batteries is essential for safety, the environment, and resource conservation. Here’s how you can responsibly dispose of them:
- Identify the Battery Type:
- First, determine the type of battery you’re recycling. Look for descriptors like “alkaline,” “lead-acid,” “lithium,” “nickel-cadmium,” or others.
- Different recycling locations accept specific types of batteries.
- Find a Recycling Service:
- Use services like Call2Recycle, Earth911, or Greener Gadgets to locate nearby recycling options.
- These services help you find local drop-off points, pick-up services, or mail-in programs.
- Energizer also provides a recycling location locator.
- Recycling Methods:
- Drop-Off Locations: Many places offer free battery recycling. Retailers like The Home Depot, Lowe’s, and Staples accept old batteries.
- Mail-In Programs: Some services, like We Recycle, allow you to mail in batteries for recycling (for a fee).
- Check Local Guidelines:
- Different states and cities have varying recycling options. Call ahead to ensure they accept the specific battery type you’re recycling.
- Some drop-off services are free, while others may charge a small fee.
- Why Recycle?
- Recycling prevents dangerous materials from ending up in landfills.
- It conserves valuable metals that can be reused.
- Proper disposal ensures safety for you, sanitation workers, and the environment.
Remember, recycling unwanted batteries benefits everyone. Let’s keep our planet greener and safer! 🌎🔋
What is the best way to cool down my phone?
If your phone is overheating, here are some simple and effective ways to cool it down:
- Stop Using the Phone for a Time:
- The best way to cool-down an overheated smartphone is to leave it aside for some time.
- If you’re using the camera, close it for a few minutes.
- Please avoid using the phone while charging, as it generates more heat.
- Keep Away from the Heat:
- High ambient temperature is a significant reason behind phone overheating.
- If you’re out in the sun, move your phone to the shade to prevent rapid warming.
- Indoors, keep your phone away from warm surfaces like beds or blankets.
- Avoid leaving it on your car’s dashboard, as extreme heat can lead to automatic shutdown.
- Lower the Screen Brightness:
- The screen consumes a lot of power and generates heat.
- Reduce screen brightness to help lower the temperature.
- Adjust the screen resolution and refresh rate temporarily.
- Close Background Apps:
- Excessive background activity can cause the phone to heat up.
- Clear recent apps or reboot your phone to see if it cools down.
- Check battery stats for any apps with abnormally high usage.
- Disable Unused Connectivity Features:
- Turn off features like Bluetooth, Wi-Fi, and mobile data when not needed.
- These connections can contribute to heat buildup.
- Turn Off High Performance or Gaming Mode:
- If your phone has performance modes, switch to a balanced or power-saving mode.
- High-performance settings can strain the processor and lead to overheating.
- Heating While charging?
- Consider using a different charger or cable if your phone heats up during charging.
- Avoid using the phone while charging to prevent additional heat.
- Keep Your Phone Updated:
- Regular software updates often include optimizations and bug fixes.
- Keeping your phone’s software up to date can improve overall performance and reduce overheating.
Remember, slight heating during heavy usage is normal, but if your phone feels unusually hot or exhibits performance issues, follow these tips to cool it down. 📱❄️
How to Fix Your Phone Overheating?
If your phone is overheating, there are several steps you can take to address the issue and prevent it from happening again:
- Remove Your Phone From the Environment:
- Manufacturers advise keeping your device in an environment between -4°F and 113°F.
- If your phone is in a hot climate (like a car on a sunny day), move it immediately to a more relaxed place.
- Avoid sudden temperature shifts (e.g., don’t put it in the freezer) as they can damage the phone components1.
- Take Off the Phone Case:
- Some phone cases, incredibly thick or heavily insulated, can trap heat.
- Removing the case allows better heat dissipation.
- Turn on Airplane Mode:
- Enable airplane mode for several minutes to turn off battery-draining features like Bluetooth.
- This can help reduce heat generation.
- Avoid Intensive Tasks:
- If your phone is hot, stop using it for resource-intensive tasks like gaming or streaming.
- These activities contribute to overheating.
- Keep It Shaded:
- Avoid direct sunlight. If your phone is outdoors, place it under a beach towel or in the shade.
- High temperatures can damage the phone’s internal components.
- Remove Charging Cable:
- If your phone is charging and overheating, unplug the charging cable.
- Charging generates heat, and removing the cable can help cool it down.
Remember, maintaining a safe internal temperature is crucial for your phone’s longevity and safety. Follow these steps to keep your phone cool and functioning optimally. 📱❄️
Phone Fixing
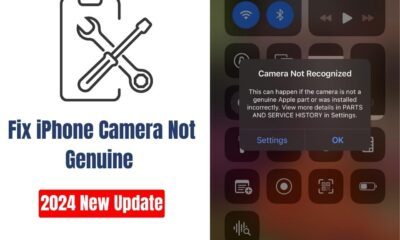
How to Fix iPhone Camera Not Genuine in 2024 Last Update

iPhone Camera Not Genuine Message
Learn how to fix the “iPhone Camera Not Genuine” error with our comprehensive troubleshooting guide. Follow simple steps to resolve issues with your iPhone’s camera hardware.
If your iPhone is displaying a message indicating that the camera may not be genuine, it can be concerning. This issue can arise due to various reasons, including software glitches, hardware issues, or the use of non-original camera components. Here’s a detailed troubleshooting guide to help you resolve this problem and get your iPhone’s camera working properly again.

iPhone Camera Not Genuine
Restart Your iPhone
Sometimes, a simple restart can resolve software-related issues like the “not genuine” message for your camera. Here’s how to restart your iPhone:
– Press and hold the side button (or the top button, depending on your iPhone model) until the power off slider appears.
– Drag the slider to turn off your iPhone.
– After your iPhone turns off, press and hold the side button again until you see the Apple logo.
Update iOS
Updating your iPhone to the latest version of iOS can fix bugs and improve compatibility with hardware components. Follow these steps to check for updates:
– Go to Settings on your iPhone.
– Tap on General, then tap on Software Update.
– If an update is available, tap Download and Install.
Check Camera Connections
If the camera has been recently replaced or repaired, it’s possible that the connection wasn’t properly secured. Here’s how to check:
– Power off your iPhone completely.
– If you’re comfortable doing so, carefully open the device (or have a professional do it).
– Ensure that the camera module is securely connected to the motherboard.
Reset All Settings
Resetting your iPhone’s settings can sometimes resolve software conflicts without affecting your data. Here’s how to do it:
– Go to Settings on your iPhone.
– Tap on General, then scroll down and tap on Reset.
– Select Reset All Settings and confirm your choice.
Contact Apple Support
If the issue persists after trying the above steps, it’s best to seek help from Apple Support ↗. They can provide further assistance and may suggest visiting an Apple Store or Authorized Service Provider for a professional evaluation.
Avoid Third-Party Repairs
Using non-Apple parts or services for iPhone repairs can lead to compatibility issues and trigger messages like “Camera Not Genuine.” Apple’s stringent hardware checks are designed to ensure optimal performance and reliability. If your iPhone has undergone third-party repairs, consider consulting Apple Support ↗ for the best course of action.
Conclusion
Resolving the “iPhone Camera Not Genuine” message can be achieved through systematic troubleshooting. By following the steps outlined above, you can identify and address the underlying cause, whether it’s a software glitch, hardware issue, or connectivity problem. If these steps don’t resolve the issue, contacting Apple Support ensures that you receive the necessary assistance to restore your iPhone’s camera functionality.
FAQs
Why is my iPhone showing a “Camera Not Genuine” message?
Why is my iPhone showing a “Camera Not Genuine” message?
Will resetting all settings delete my data?
No, resetting all settings will not delete your data. It resets preferences like Wi-Fi passwords and wallpaper but preserves your apps, photos, and personal data.
Should I attempt to repair the iPhone myself if I suspect a hardware issue?
It’s generally recommended to seek professional help for hardware repairs to avoid damaging your iPhone further. Apple Stores and Authorized Service Providers have trained technicians who can safely diagnose and fix hardware issues.
How can I prevent the “Camera Not Genuine” message in the future?
To avoid such issues, always use genuine Apple parts for repairs and ensure any repairs are conducted by authorized technicians. Keeping your iPhone updated with the latest iOS version also helps maintain compatibility and performance.
Related: iPhone Camera Not Genuine
Phone Fixing
How to Screenshot on Mac and Crop Easy Guide in 2024 Update

How to Screenshot on Mac and Crop in 2024
Learn how to screenshot on Mac and crop images easily with our step-by-step guide. Perfect for capturing and editing your screen quickly!
Taking screenshots is a fundamental skill for any Mac user, whether you’re capturing a funny meme, documenting an error message, or saving a receipt. But how do you take a screenshot on a Mac and crop it to just the part you need? Let’s dive into the various methods and tips to master this essential skill.
How to Screenshot on Mac and Crop
Screenshots are incredibly versatile. They can be used for work presentations, personal projects, and even troubleshooting technical issues. Knowing how to take and edit screenshots efficiently can save you time and make your digital life easier.
Different Methods to Take Screenshots on a Mac
Using Keyboard Shortcuts
Keyboard shortcuts are the quickest way to take screenshots on a Mac. Here are the primary shortcuts:
- Command (⌘) + Shift + 3: Captures the entire screen.
- Command (⌘) + Shift + 4: Captures a selected portion of the screen.
- Command (⌘) + Shift + 5: Opens the Screenshot app, offering various capture options. ↗
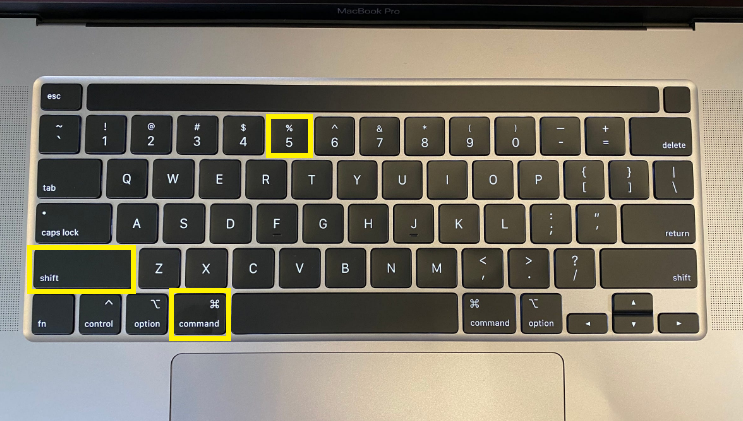
How to Screenshot on Mac and Crop
Using the Touch Bar
If you have a MacBook with a Touch Bar, you can customize it to include a screenshot button. This feature allows you to take screenshots without memorizing shortcuts.
Using the Screenshot App
macOS includes a built-in Screenshot app that provides a user-friendly interface for capturing your screen. You can find it in the Utilities folder or by pressing Command (⌘) + Shift + 5.
How to Access Screenshots on Mac
Default Save Location
By default, screenshots are saved to your desktop with filenames like “Screen Shot [date] at [time].png”.
Changing the Save Location
You can change where your screenshots are saved by opening the Screenshot app (Command (⌘) + Shift + 5), clicking “Options,” and selecting a new save location.
How to See Screenshots on Mac
Using Finder
Open Finder and navigate to your desktop or the folder where your screenshots are saved.
Using Spotlight Search
Press Command (⌘) + Space and type “screenshot” to quickly locate your screenshots using Spotlight Search.
How to Delete Screenshots on Mac
Deleting Single Screenshots
Select the screenshot file and press Command (⌘) + Delete to move it to the trash.
Bulk Deletion of Screenshots
To delete multiple screenshots, hold Command (⌘) while selecting files, then press Command (⌘) + Delete.
How to Take a Cropped Screenshot on Mac
Using Keyboard Shortcuts for Cropped Screenshots
Press Command (⌘) + Shift + 4, then drag to select the area you want to capture. Release the mouse or trackpad to take the screenshot.
Using Preview to Crop Screenshots
- Open the screenshot in Preview.
- Select the area you want to keep using the selection tool.
- Click “Tools” in the menu bar, then “Crop.”
Advanced Screenshot Tips and Tricks
Taking Timed Screenshots
In the Screenshot app, you can set a timer for your screenshot. Click “Options” and choose a timer duration to capture delayed screenshots.
Capturing Specific Windows or Menus
Press Command (⌘) + Shift + 4, then press the Spacebar. Click on the window or menu you want to capture.
Common Issues and Troubleshooting
Screenshots Not Saving
Ensure your Mac has enough storage space and that you’ve selected a valid save location.
Screenshots Not Appearing on Desktop
Check your Screenshot app settings to confirm the save location. Screenshots might also be in iCloud if you use Desktop & Documents syncing.
How to Share Screenshots from Mac
Using AirDrop
AirDrop allows you to wirelessly share screenshots with other Apple devices. Right-click the screenshot and select “Share” > “AirDrop.”
Using Email and Messaging Apps
Attach your screenshot to an email or message by dragging it into the message window.
Conclusion
Taking and managing screenshots on a Mac is a breeze once you know the right techniques. From basic keyboard shortcuts to advanced editing and organization, these tips will help you capture and utilize screenshots effectively.
FAQ
How do I take a screenshot of a specific window on a Mac?
Press Command (⌘) + Shift + 4, then press the Spacebar. Click the window you want to capture.
Can I change the format of my screenshots on a Mac?
Yes, you can change the default format using Terminal commands or third-party apps.
How do I capture a scrolling window on a Mac?
You need a third-party app like Snagit to capture scrolling windows.
Why are my screenshots blurry?
Ensure you’re capturing at full resolution and that the file format is not overly compressed.
How do I annotate screenshots on a Mac?
Use Preview or a third-party app to add text, shapes, and highlights to your screenshots.
Phone Fixing
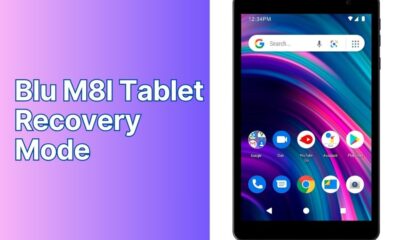
How to Access Blu M8l tablet recovery mode: A Step-by-Step Guide

Blu M8l Tablet Recovery Mode
Learn how to access Blu M8l tablet recovery mode tablet with our Easy guide. Troubleshoot issues and perform maintenance tasks easily.
In this digital age, knowing how to access recovery mode on your Blu M8L tablet can be a lifesaver. Whether you’re troubleshooting issues or looking to perform a factory reset, recovery mode is a powerful tool at your disposal. This guide will walk you through the process, ensuring you can navigate your device with ease.
What is Blu M8l Tablet Recovery Mode
Before diving into the steps, let’s briefly discuss what recovery mode is. Recovery mode is a built-in feature on Android devices like the Blu M8L tablet that allows users to perform various maintenance and diagnostic tasks. It provides access to tools that can help resolve software issues, recover data, and perform system updates.
Accessing Blu M8l Tablet Recovery Mode
Step 1: Power Off Your Device
To begin, ensure your Blu M8L tablet ↗ is powered off completely. Press and hold the power button until the power menu appears on the screen.
Step 2: Navigate to Recovery Mode
Once the device is powered off, press and hold the volume up and power buttons simultaneously. Keep holding both buttons until the device vibrates, indicating it is entering recovery mode.
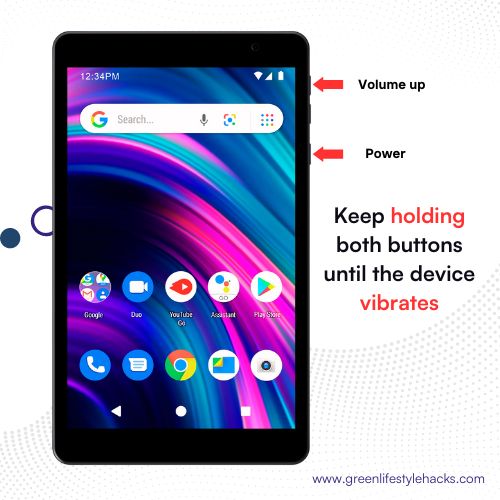
Step 3: Enter Recovery Mode
If the device begins to shake, then let go of the power button and remaining holding the volume-up button. This will trigger the reboot into recovery mode, showing the recovery menu on the display.
Step 4: Navigate Recovery Menu
When in recovery mode, you’ll be able to access the menu with the button for volume control to display options, as well as the power button for selecting. In this menu, you are able to do various things like resetting your device to factory settings installing updates or even accessing the recovery tools.
Use Volume keys to navigate and the Power button to select.
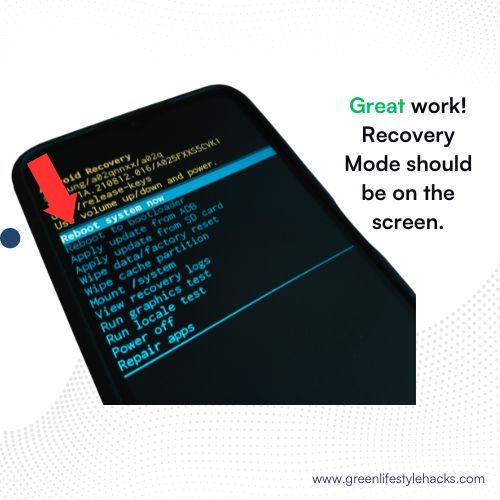
Blu M8l All Tablets Recovery Mode Menu Options Explained
| Option | Description |
|---|---|
| Reboot system now | Restart the device |
| Reboot to bootloader | Enter bootloader mode for advanced tasks |
| Enter fastboot | Enter fastboot mode for low-level modifications |
| Apply update from ADB | Install system updates from a computer |
| Apply update from SD card | Install system updates from an SD card |
| Wipe data/factory reset | Restore to factory settings, erasing all data |
| Wipe cache partition | Clear temporary system data |
| Mount /system | Manually mount/unmount the system partition |
| View recovery logs | Check recovery system logs for errors |
| Run graphics test | Test the device’s graphics performance |
| Run locale test | Test the device’s language and region settings |
| Power off | Turn off the device |
| Repair apps | Attempt to repair problematic apps |
Tips for Using Recovery Mode Effectively
Tip 1: Backup Your Data
Prior to performing any action within recovery mode, you must ensure that your data is protected in order to avoid any loss. Utilise the backup options within the recovery menus to protect your data.
Tip 2: Follow Instructions Carefully
In the recovery mode you’ll be in make sure you adhere to all instructions displayed on the screen in order to avoid accidental actions. Check each step carefully prior to moving on to assure that you’re choosing the right feature.
Tip 3: Perform a Factory Reset Wisely
Factory resets should only be taken as a last resort in the event of a problem with the Blu M8L ↗ tablet. It is important to note that this procedure can erase all the data stored that is stored on the device and return it to the initial settings.
Conclusion
The recovery mode that you can access on the Blu M8L tablet ↗ is an easy process that could greatly assist in the resolution of problems with software and completing routine maintenance tasks. Following the steps laid out in this tutorial and applying the suggestions given, you will be able to use recovery mode without fear and ensure that your device is running efficiently.
FAQs (Frequently Asked Questions)
Can I access recovery mode if my device is not responding?
Yes, recovery mode can often be accessed even if your device is experiencing issues. Follow the steps outlined in this guide to enter recovery mode and troubleshoot the problem.
Will accessing recovery mode void my warranty?
No, accessing recovery mode on your Blu M8L tablet should not void your warranty. It is a built-in feature designed to help users troubleshoot and maintain their devices.
Can I exit recovery mode without performing any actions?
Yes, you can exit recovery mode without performing any actions by selecting the reboot option from the recovery menu. This will restart your device normally.
How often should I use recovery mode?
Recovery mode is typically used when troubleshooting specific issues or performing maintenance tasks. There’s no set frequency for using recovery mode, but it’s a good idea to familiarize yourself with the process in case it’s needed.
Will accessing recovery mode delete all my data?
Accessing recovery mode itself will not delete your data. However, performing certain actions within recovery mode, such as a factory reset, will erase all data on your device.
Related:
Android Phone Overheating and How to Fix Your Phone in 2024
The Ultimate Guide to Using the Samsung S21 Ultra in 2024

 Phone Fixing7 months ago
Why Can’t I Click ‘Allow’ for App Permissions: How to fix in 2024

 Phone Fixing2 months ago
How to Access Blu M8l tablet recovery mode: A Step-by-Step Guide

 How To Guides5 months ago
How To Change Your Apple Watch Face: A Step-By-Step Guide in 2024

 Home Appliances7 months ago
Step-by-Step Guide: How to Cast Crunchyroll to Your LG TV

 Home Appliances5 months ago
How to Connect Furrion TV to WiFi in 2024

 Phone Fixing5 months ago
Understanding and Resolving White Spots on Your Phone Screen

 How To Guides6 months ago
Mastering the Bellows Plunger: A Step-by-Step Guide

 How To Guides6 months ago
How to Block YouTube on a Vizio Smart TV in 2024 Easy Guide
















Pingback: How to Connect AirPods to Chromebook in 2024: Simple Steps
Pingback: How to Blu M8l tablet recovery mode - Green Lifestyle Hacks