Phone Fixing
How to Screenshot on Mac and Crop Easy Guide in 2024 Update
How to Screenshot on Mac and Crop in 2024
Learn how to screenshot on Mac and crop images easily with our step-by-step guide. Perfect for capturing and editing your screen quickly!
Taking screenshots is a fundamental skill for any Mac user, whether you’re capturing a funny meme, documenting an error message, or saving a receipt. But how do you take a screenshot on a Mac and crop it to just the part you need? Let’s dive into the various methods and tips to master this essential skill.
How to Screenshot on Mac and Crop
Screenshots are incredibly versatile. They can be used for work presentations, personal projects, and even troubleshooting technical issues. Knowing how to take and edit screenshots efficiently can save you time and make your digital life easier.
Different Methods to Take Screenshots on a Mac
Using Keyboard Shortcuts
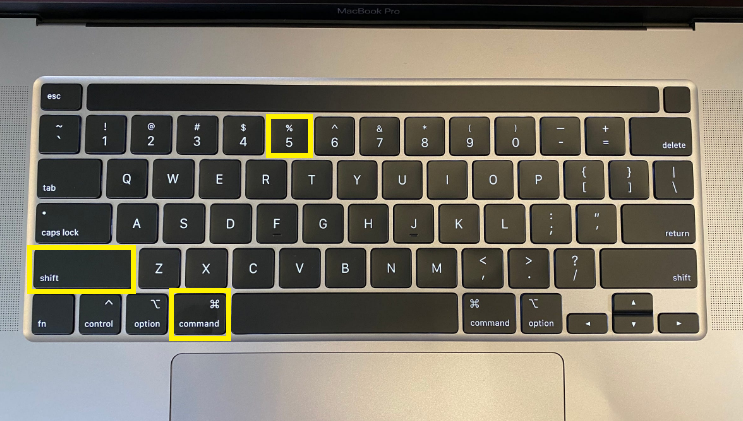
Keyboard shortcuts are the quickest way to take screenshots on a Mac. Here are the primary shortcuts:
-
- Command (⌘) + Shift + 3: Captures the entire screen.
-
- Command (⌘) + Shift + 4: Captures a selected portion of the screen.
-
- Command (⌘) + Shift + 5: Opens the Screenshot app, offering various capture options. ↗

How to Screenshot on Mac and Crop
Using the Touch Bar
If you have a MacBook with a Touch Bar, you can customize it to include a screenshot button. This feature allows you to take screenshots without memorizing shortcuts.
Using the Screenshot App
macOS includes a built-in Screenshot app that provides a user-friendly interface for capturing your screen. You can find it in the Utilities folder or by pressing Command (⌘) + Shift + 5.
How to Access Screenshots on Mac
Default Save Location
By default, screenshots are saved to your desktop with filenames like “Screen Shot [date] at [time].png”.
Changing the Save Location
You can change where your screenshots are saved by opening the Screenshot app (Command (⌘) + Shift + 5), clicking “Options,” and selecting a new save location.
How to See Screenshots on Mac
Using Finder
Open Finder and navigate to your desktop or the folder where your screenshots are saved.
Using Spotlight Search
Press Command (⌘) + Space and type “screenshot” to quickly locate your screenshots using Spotlight Search.
How to Delete Screenshots on Mac
Deleting Single Screenshots
Select the screenshot file and press Command (⌘) + Delete to move it to the trash.
Bulk Deletion of Screenshots
To delete multiple screenshots, hold Command (⌘) while selecting files, then press Command (⌘) + Delete.
How to Take a Cropped Screenshot on Mac
Using Keyboard Shortcuts for Cropped Screenshots
Press Command (⌘) + Shift + 4, then drag to select the area you want to capture. Release the mouse or trackpad to take the screenshot.
Using Preview to Crop Screenshots
- Open the screenshot in Preview.
- Select the area you want to keep using the selection tool.
- Click “Tools” in the menu bar, then “Crop.”
Advanced Screenshot Tips and Tricks
Taking Timed Screenshots
In the Screenshot app, you can set a timer for your screenshot. Click “Options” and choose a timer duration to capture delayed screenshots.
Capturing Specific Windows or Menus
Press Command (⌘) + Shift + 4, then press the Spacebar. Click on the window or menu you want to capture.
Common Issues and Troubleshooting
Screenshots Not Saving
Ensure your Mac has enough storage space and that you’ve selected a valid save location.
Screenshots Not Appearing on Desktop
Check your Screenshot app settings to confirm the save location. Screenshots might also be in iCloud if you use Desktop & Documents syncing.
How to Share Screenshots from Mac
Using AirDrop
AirDrop allows you to wirelessly share screenshots with other Apple devices. Right-click the screenshot and select “Share” > “AirDrop.”
Using Email and Messaging Apps
Attach your screenshot to an email or message by dragging it into the message window.
Conclusion
Taking and managing screenshots on a Mac is a breeze once you know the right techniques. From basic keyboard shortcuts to advanced editing and organization, these tips will help you capture and utilize screenshots effectively.
FAQ
How do I take a screenshot of a specific window on a Mac?
Press Command (⌘) + Shift + 4, then press the Spacebar. Click the window you want to capture.
Can I change the format of my screenshots on a Mac?
Yes, you can change the default format using Terminal commands or third-party apps.
How do I capture a scrolling window on a Mac?
You need a third-party app like Snagit to capture scrolling windows.
Why are my screenshots blurry?
Ensure you’re capturing at full resolution and that the file format is not overly compressed.
How do I annotate screenshots on a Mac?
Use Preview or a third-party app to add text, shapes, and highlights to your screenshots.